Deploy Smart Contracts
In this section, we'll deploy your token contract to your local environment and also deploy and interact with the contract on the Rootstock network.
Step 1: Configure Deployment File
To configure your deployment file:
- Navigate to the
scriptsdirectory in the root directory of the quick start repo:
cd scripts
- In the scripts directory, open the
deploy.jsdeployment file:
To deploy myToken contract, copy the deployment script below and paste it in your deployment file or see the deploy.js file on GitHub.
async function main() {
  const [deployer] = await ethers.getSigners();

  console.log("Deploying contracts with the account:", deployer.address);

  const MyToken = await ethers.getContractFactory("MyToken");
  const myToken = await MyToken.deploy(1000);

  console.log("Token address:", myToken.address);
}

main().catch((error) => {
  console.error(error);
  process.exitCode = 1;
});
Step 2: Run the Hardhat Network Locally
Note: You need to have sufficient RBTC in your deploying account for gas fees. See section on Fund your account.
To run the Hardhat network locally:
-
Start the Hardhat network
- Hardhat comes with a built-in Ethereum network for development. Run the following command in your project's root directory to start it.
This command will start a local blockchain network and display a list of available accounts and private keys:
npx hardhat node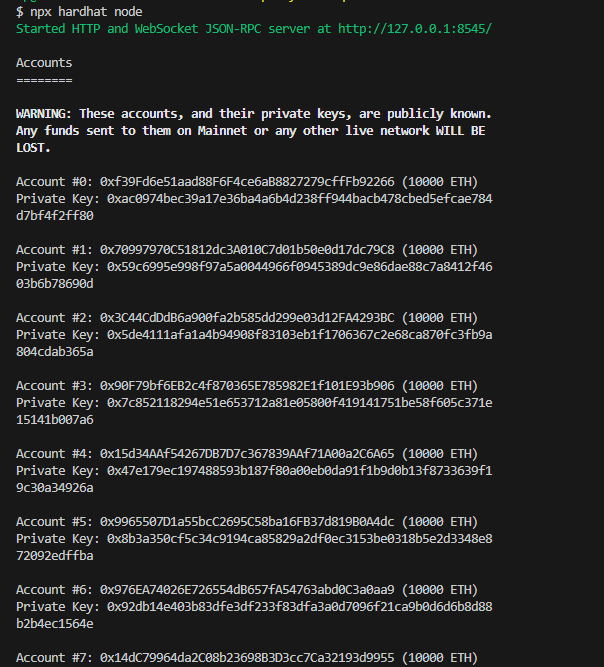
- Hardhat comes with a built-in Ethereum network for development. Run the following command in your project's root directory to start it.
-
Deploy your contract to the local network
-
Deploy your contract to the local Hardhat network, in another terminal or command prompt, run the command below in the root directory:
npx hardhat run --network hardhat scripts/deploy.jsThis should give a result similar to the following:
npx hardhat run --network hardhat scripts/deploy.js

Deploying contracts with the account: 0xf39Fd6e51aad88F6F4ce6aB8827279cffFb92266
Token address: 0x5FbDB2315678afecb367f032d93F642f64180aa3
-
Step 3: Deploy Your Contract on Rootstock Network
Follow these steps to deploy your contract on Rootstock network:
- Use Hardhat's run command to deploy your contract, depending on the desired network. You can choose to deploy to either Rootstock's Testnet or Mainnet.
To deploy to the Rootstock Testnet, run:
npx hardhat run --network rskTestnet scripts/deploy.js
This should return the following:
% npx hardhat run --network rskTestnet scripts/deploy.js
Deploying contracts with the account: 0xA210D04d707f6beBF914Cb1a57199Aebe7B40380
Token address: 0xc6EcBe0F6643825FD1AAfc03BEC999014759a279
- To deploy to the Rootstock Mainnet, run:
npx hardhat run --network rskMainnet scripts/deploy.js
Configure MetaMask
If you haven't already, you can use the metamask-landing.rifos.org tool to download/install Metamask, and add Rootstock custom network or follow the steps in Configure Network and Token.
Step 4: Interact with your deployed contract
To interact with your deployed contract, you can create an interaction script using JavaScript/TypeScript and the Ethers.js library.
- Create a
interact.jsfile in thescriptsdirectory:
touch scripts/interact.js
- Paste the following code in the
interact.jsfile:
const hre = require("hardhat");

async function main() {
  try {
    // Get the ContractFactory of your MyToken contract
    const MyToken = await hre.ethers.getContractFactory("MyToken");

    // Connect to the deployed contract
    const contractAddress = "0x543ba9FC0ade6f222BD8C7Bf50a0CD9923Faf569"; // Replace with your deployed contract address
    const contract = await MyToken.attach(contractAddress);

    // Retrieve the balance of an account
    const account = "0x28eb8D29e4713E211D1dDab19dF3de16086BB8fa";
    const balance = await contract.balanceOf(account);

    // Retrieve the symbol of the token
    const symbol = await contract.symbol();

    console.log(
      `Balance of ${account} account: ${balance.toString()} ${symbol}`
    );
  } catch (error) {
    console.error(error);
    process.exit(1);
  }
}

main();
- And run the interaction script. This is how you can do it on testnet:
npx hardhat run scripts/interact.js --network rskTestnet
- And this is how you can do it on mainnet:
npx hardhat run scripts/interact.js --network rskMainnet
- The expected output by running the interaction script is:
Balance of 0x28eb8D29e4713E211D1dDab19dF3de16086BB8fa account: 1000 MTK